
If you’ve ever remodeled a kitchen in Montana, you already know the biggest myth in home improvement is “We’ll just play it by ear.” That works right up until your cabinets are still in the shop, your electrician is booked out, and you’re washing dishes in the bathtub.
January is when people in Bozeman, Big Sky, and the Gallatin Valley start planning in earnest. You’re inside more, you’ve got time to think, and you’ve probably spent the holidays muttering under your breath about your current kitchen layout.
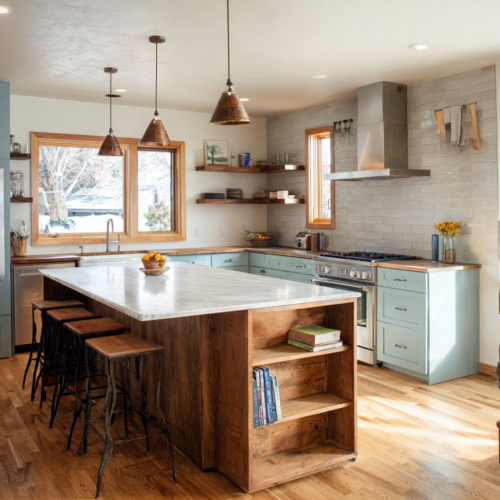
So here’s a kitchen remodel timeline that actually works in Montana. It’s built around real decision points: when to lock appliances, when measurements matter, how custom cabinet lead times affect everything, and how to keep the job moving without rushing the parts that shouldn’t be rushed.
If you want custom cabinetry to fit right, function well, and still look great ten winters from now, use this as your playbook.
Why a Montana-friendly timeline matters
Montana projects have a few quirks that aren’t in the average “HGTV schedule”:
- Winter weather can slow deliveries and jobsite access.
- Dry indoor air and seasonal swings make precision work (like cabinetry and trim) worth planning carefully.
- Good tradespeople book up early, especially heading into spring and summer.
A realistic timeline helps you avoid the two most expensive remodel words: “change order.”
The step-by-step kitchen remodel timeline from ideas to install
This timeline assumes a standard-to-full kitchen remodel. Smaller “cabinet swap and counters” jobs can run faster. Full gut remodels, structural changes, or major re-routing can run longer. The point is the sequence.
Step 1: Weeks 0–2 — Define the goal, not just the look
Start with how you want the kitchen to work, not just what you want it to look like.
- What’s broken today: storage, workflow, lighting, seating, prep space?
- What matters most: entertaining, baking, family traffic flow, everyday durability?
- Set a budget range and decide what’s flexible and what isn’t.
This is also the right time to start collecting inspiration photos, but keep it practical. A photo doesn’t show you where the trash goes, and that’s the part you live with.
Step 2: Weeks 2–4 — Get the layout direction and rough measurements
Before anyone orders anything, get clear on layout changes:
- Keep the sink where it is, or move it?
- Is the island staying, growing, or disappearing?
- Are you changing windows, doors, or openings?
Measurements at this stage can be “good enough” for design planning, but you need to know the big constraints.
If you’re working with Wilson Cabinetry, this is when we can start shaping storage and layout based on how you actually cook and move through the space.
Custom Cabinets: https://wilsoncabinetry.com/custom-cabinets/
Step 3: Weeks 3–6 — Lock appliances and key fixtures (this is where schedules live or die)
Appliances aren’t an afterthought. They drive cabinet sizing, electrical, plumbing, and venting.
Lock in (or at least lock in exact sizes for):
- Range or cooktop + wall oven
- Refrigerator (counter-depth vs standard, built-in vs freestanding)
- Dishwasher
- Hood insert or vent hood dimensions
- Microwave placement (drawer vs built-in vs counter)
Also confirm sink type and faucet specs. These decisions affect rough-ins and cabinet engineering. Waiting on appliances is one of the most common ways a kitchen renovation schedule goes sideways.
Step 4: Weeks 4–8 — Cabinet design, storage planning, and approvals
This is the heart of the plan: cabinet layout, functionality, and fit.
You’ll work through:
- Door style direction (Shaker, slab, etc.)
- Finish direction (paint vs stain vs clear)
- Storage solutions (deep drawers, tray dividers, pantry pull-outs, trash/recycling)
- Crown, panels, fillers, and how the cabinetry meets the room
This is also when we confirm the details that prevent headaches later: clearances, landing space, swing conflicts, and what needs to be field-verified.
If you want to understand how we build for Montana homes and real use, start here:
Custom Cabinets: https://wilsoncabinetry.com/custom-cabinets/
Step 5: Weeks 6–10 — Final field measurements and “no surprises” checks
Once demo is planned (or after selective demo), you’ll do final measurements that matter:
- True wall lengths and out-of-square conditions
- Window and door heights
- Floor level changes
- Any framing adjustments needed for appliances or hood venting
This is the point where “close enough” becomes “exact.” Getting these measurements right protects everything downstream.
Step 6: Weeks 8–12 — Production time and lead times (where custom cabinet lead times come in)
Custom cabinet lead times vary based on scope, finish complexity, and season, but this is typically when your cabinets are being built and finished.
While cabinets are in production, the jobsite should be preparing:
- Electrical and plumbing rough-ins
- Lighting plan execution (under-cabinet wiring is easier now than later)
- Drywall repairs, paint prep, and flooring coordination
This overlap is what keeps the schedule tight without rushing.
Step 7: Weeks 10–12 — Demo and prep (time it so you’re not camping for months)
Plan demo so you’re not without a functional kitchen longer than necessary.
Good demo timing usually means:
- You have final cabinet plans approved
- You have a clear production and install window
- Rough-ins are ready to begin immediately after demo
A “demo first, plan later” approach is how people end up living on paper plates until spring.
Step 8: Weeks 12–14 — Cabinet install
Cabinet install is a milestone, but it’s not the finish line.
During this phase:
- Boxes get set, leveled, and secured
- Panels and fillers are fitted
- Hardware prep begins
- Trim details are staged
Once cabinets are installed, countertops can be templated.
Step 9: Weeks 14–16 — Countertops, backsplash, and final trim
After templating:
- Countertops are fabricated and installed
- Plumbing reconnect happens
- Backsplash goes in
- Final cabinet adjustments and trim details get completed
Step 10: Weeks 16–18 — Punch list and “make it feel finished”
This is where the kitchen stops looking like a jobsite and starts looking like your home again:
- Touch-ups
- Door and drawer adjustments
- Final hardware tightening
- Lighting and appliance commissioning
- Final walkthrough with your contractor
The fast milestone checklist (save this part)
If you remember nothing else, remember these decision milestones:
- Layout direction and rough measurements
- Appliance sizes and key fixtures locked
- Cabinet design approved (storage, door style, finish direction)
- Final field measurements completed
- Install window scheduled with trades coordinated
That’s the backbone of a kitchen remodel timeline in Montana that actually works.
FAQ
How long does a kitchen remodel take in Montana?
Most kitchen remodels run 8–18+ weeks depending on scope. The best way to shorten the timeline is to lock appliances and cabinet decisions early and keep trades sequenced.
When should I contact a cabinet shop during planning?
As early as you have rough measurements and a layout direction. Cabinet planning affects rough-ins, timelines, and costs, so it should not be a last-minute call.
Do winter remodels make sense in Bozeman and Big Sky?
Yes, especially for interior work. Winter can be a great time to plan and execute cabinetry, finishing, and interior upgrades, as long as deliveries and scheduling are planned realistically.